Text Box:  OPERATION TONGA


Operation Tonga was the air lift by 38 and 46 Groups, of the 6th Airborne Division on the night 05/06 June 1944, to Normandy to secure the Allied left flank in the opening of the invasion of France.

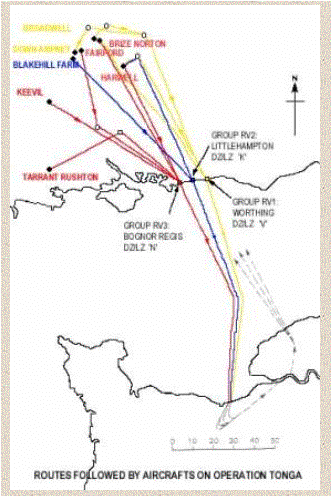
Special Eureka* and light beacons would be placed at points of departure for aircrafts on the south coast of England for them to RV on.


Group RV1: all aircrafts going to LZ/DZ ‘V’, Varaville flying over Worthing, light flashing ‘V’, Eureka ‘CA’,

Group RV2: all aircrafts going to LZ/DZ ‘K’,Touffreville flying over Littlehampton, light flashing ‘K’, Eureka ‘DC’,

Group RV3: all aircrafts going to LZ/DZ ‘N’, Ranville  flying over Bognor Regis, light flashing ‘N’, Eureka ‘ED’,
Text Box:
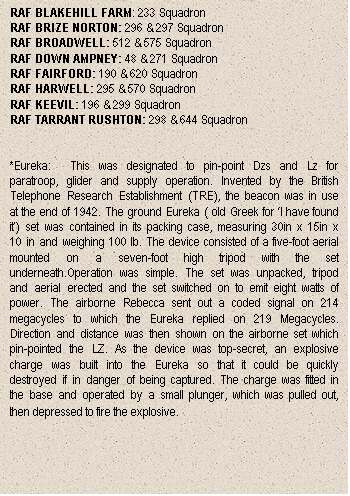
Text Box: RAF BLAKEHILL FARM: 233 Squadron
RAF BRIZE NORTON: 296 & 297 Squadron
RAF BROADWELL: 512 & 575 Squadron
RAF DOWN AMPNEY: 48 & 271 Squadron
RAF FAIRFORD: 190 & 620 Squadron
RAF HARWELL: 295 & 570 Squadron
RAF KEEVIL: 196 & 299 Squadron
RAF TARRANT RUSHTON: 298 & 644 Squadron


*Eureka:  This was designated to pin-point Dzs and Lz for paratroop, glider and supply operation. Invented by the British Telephone Research Establishment (TRE), the beacon was in use at the end of 1942. The ground Eureka ( old Greek for ‘I have found it’) set was contained in its packing case, measuring 30in x 15in x 10 in and weighing 100 lb. The device consisted of a five-foot aerial mounted on a seven-foot high tripod with the set underneath.Operation was simple. The set was unpacked, tripod and aerial erected and the set switched on to emit eight watts of power. The airborne Rebecca sent out a coded signal on 214 megacycles to which the Eureka replied on 219 Megacycles. Direction and distance was then shown on the airborne set which pin-pointed the LZ. As the device was top-secret, an explosive charge was built into the Eureka so that it could be quickly destroyed if in danger of being captured. The charge was fitted in the base and operated by a small plunger, which was pulled out, then depressed to fire the explosive.


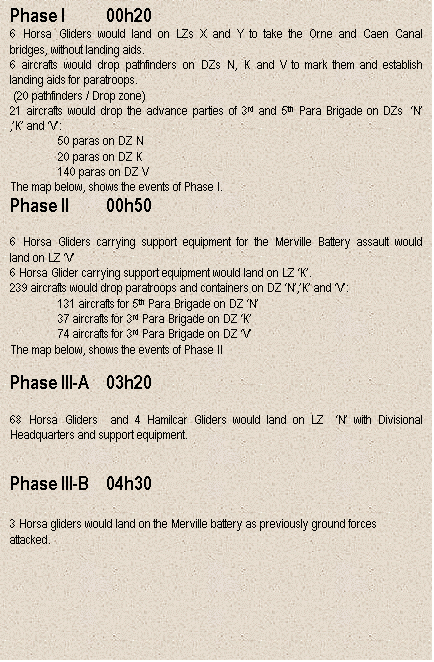
Text Box: Phase I	00h20
6 Horsa Gliders would land on LZs X and Y to take the Orne and Caen Canal bridges, without landing aids.
6 aircrafts would drop pathfinders on DZs N, K and V to mark them and establish landing aids for paratroops.
 (20 pathfinders / Drop zone)
21 aircrafts would drop the advance parties of 3rd and 5th Para Brigade on DZs  ‘N’ ,’K’ and ‘V’:
50 paras on DZ N
20 paras on DZ K
140 paras on DZ V
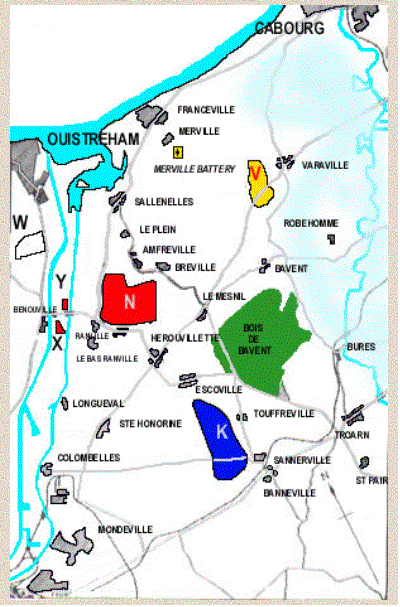
The map below, shows the events of Phase I.
Phase II	00h50

6 Horsa Gliders carrying support equipment for the Merville Battery assault would land on LZ ‘V’
6 Horsa Glider carrying support equipment would land on LZ ‘K’.
239 aircrafts would drop paratroops and containers on DZ ‘N’,’K’ and ‘V’:
	131 aircrafts for 5th Para Brigade on DZ ‘N’
	37 aircrafts for 3rd Para Brigade on DZ ‘K’
	74 aircrafts for 3rd Para Brigade on DZ ‘V’ 
The map below, shows the events of Phase II

Phase III-A	03h20

68 Horsa Gliders  and 4 Hamilcar Gliders would land on LZ  ‘N’ with Divisional Headquarters and support equipment. 


Phase III-B	04h30

3 Horsa gliders would land on the Merville battery as previously ground forces attacked.
Text Box:                         


Text Box: